ADD THE SLIDER CODE HERE

Saturday 20 August 2011

DIY Shabby Chic French Memo Board

French Inspired Memo Board

I’m always writing little notes and reminders to myself, so my desk is typically drowning in post-it notes. I’ve thought about buying a memo board in the past but they’re usually so stark and boring, I finally decided I could make something that was just as functional but a lot more aesthetically pleasing myself. I love shabby chic style so a French memo board was the perfect choice.     


What I used
What I used 

- 16 x 12 MDF board
- Wadding
- Fabric
- Ribbon
- Buttons
- Peg clips
- Mounting tape
- PVA Fabric glue
- Scissors
- Pinking shears
- Tape measure
- Dress maker’s pencil/tailor’s chalk

What I Did

1) Rose-print fabric
1) I chose this gorgeous vintage rose print fabric and found pretty East of India ribbon to match. I found these cute miniature peg clips in a craft shop –they’re perfect for attaching little notes to the finished memo board.

2) Next I had a board cut to size –thank you Dad! I used MDF although an old noticeboard or pinboard would work just as well. I asked for the corners to be mitred for a more professional finish.

3) I cut a piece of the wadding to fit and fixed it to the board with a little fabric glue.


3) The board and wadding cut to size

4) When the glue was dry I laid the board upside down on the fabric and carefully cut around it, leaving a 2.5’’ margin.

I used pinking shears to avoid the fabric fraying although if you don’t have these to hand regular scissors are fine too. As I can’t cut a straight line to save my life I used a dressmaker’s pencil to lightly mark where I had to cut the fabric.

5) I began to fold the fabric over the board, starting with the corners. Instead of using a staple gun I used strong mounting tape, fixing it to the board first and then pulling the fabric taut and sticking it down. 


         4) Cutting the fabric                                                            5) Fixing it in place with adhesive tape
6) Positioning the ribbon

6) Now the tricky part- positioning the ribbon. I found it easiest to fix the two diagonal pieces running across the board in place first. Through trial and error I decided how far apart I wanted the rest of the ribbon to be spaced, then using the diagonals as a guide, I measured a couple of points to check they were all running parallel before fixing them with the mounting tape.

7) I sewed a button onto each of the crossing points.

8) Finally I fixed a length of ribbon to the back to hand the board up. Et viola! C’est fini.


7) Ready to sew on the buttons                                             8) The finished board with ribbon for hanging

Wednesday 10 August 2011

Graze Review + Grab Your Free Box Now!


A few days ago a friend gave me a promotional code for a free ‘Graze box’. ‘A grazing what?’ I thought confused as an image of a crate of grass popped into my head. It turns out Graze is an online company who send out healthy, nutritious snacks by post. The ‘box’ is simply the environmentally friendly packaging they come in. The service works much like a magazine subscription; you create an account on the Graze website, giving your address and billing details and for a little over £3 a week you’re sent a Graze box containing four of their specially selected snacks.

The Graze Box
Inside, the four punnets of nibbles
They currently have over a hundred different foods grouped into categories like ‘crackers’, ‘natural treats’ and ‘dried fruit’. Although many of the options have similar ingredients –for example I counted 53 out of 113 snacks that contain nuts– so maybe it’s not for you if you’re picky or have allergies. You’re invited to rate each snack, choosing from ‘bin it’ if you don’t want to receive it at all, ‘try it’, ‘like it’ or ‘love it’. How you rate a snack determines how often you’re likely to get it in your box. There’s also a ‘send soon’ tick box for when you really want to try something. You don’t have complete control over the nibbles you get but you can roughly tailor it to your requirements. It’s great if you like most foods and enjoy surprises, which luckily I do!

My first box arrived on my nominated day with the normal post. I was impressed by how generous it was –about the size and shape of an A5 notebook– compared to similar healthy snacks Graze doesn’t score too badly in the value-for-stakes. The box came with a couple of leaflets, one with the usual nutritional information and one extolling the Graze philosophy, including what seems to be their mantra “eat more healthy things, fewer muffins”, as a confirmed cake-o-holic I’m a little sceptical but I’m prepared to give it a try!      
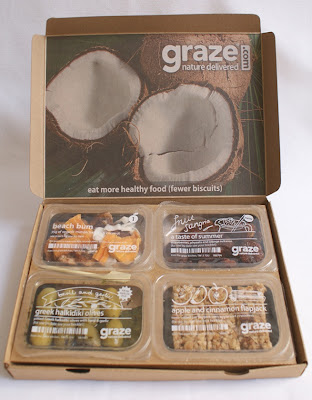

Ready to start snacking
Inside the box there were four individually sealed plastic punnets that lifted out of the cardboard base, so if you wanted to you could easily slip one in your handbag or lunch box. The first tray Greek Halkidiki Olives contained eight plump olives in a delicious basil and garlic marinade that added a really nice subtle flavour but didn’t overpower the taste of the olives. The next two trays were both dried fruit mixes, Fruit Sangria a medley of super-sweet juicy strawberries, physalis and orange sultanas -if you don’t know what a physalis is you’re not alone, I looked it up and according to Wikipedia it’s Pronounced /ˈfaɪsəlɪs/, ˈfɪsəlɪs, faɪ'seɪlɪs, faɪˈsalɪs Physalis is a genus of plants in the nightshade family (Solanaceae), native to warm temperate and subtropical regions throughout the world. The genus is characterised by the small orange fruit similar in size, shape and structure to a small tomato, but partly or fully enclosed in a large papery husk derived from the calyx.  a posh gooseberry basically. It added a nice tart flavour that contrasted perfectly with the sweetness of the strawberries. Oh the strawberries, I could have eaten a box of those on their own! The second fruit mix Beach Bum was less successful, I found the dried mango and banana pretty tasteless and the coconut a little like eating shredded cardboard. On the up side the final carton contained three scrumptiously moreish Apple and Cinnamon Flapjacks. I loved the rustic home-made taste these had and the fact they contained real juicy pieces of apple, delicious! Overall I was very impressed with the Graze website and the variety and quality of the food. It’s a great idea for people who would like to eat more healthily but perhaps don’t have the time to prepare nutritious snacks themselves. Personally I may not be ready to renounce cake yet but I could definitely see myself grazing through one of these yummy boxes everyday.

To try Graze for free, go to Graze.com and enter the promotional code RZM8GKW3. Credit or debit card required, for full terms and conditions please see the Graze website

Saturday 6 August 2011

A Taste of Thailand

I love travelling. I love visiting new places, I love learning about the culture and I love trying the local cuisine. Last week I got to experience a little taste of Thailand at home when a friend invited me over for what turned out to be an epic four-course Thai feast. This wasn’t Thai food as we are most familiar with it- the kind of dishes you may be served in a restaurant- but the real food that is cooked and eaten everyday on Thailand's bustling streets.  

Thai Pork Skewers cooked on the barbeque
Prawn Cakes with Chilli & Peanut Sauce
The culinary tour began with delicious marinated pork skewers, cooked on the barbeque to seal in the flavour and give them a wonderful smoky taste. Next came crunchy prawn cakes -succulent fresh prawns covered in a light rice batter and deep fried until crispy and golden- accompanied by a feisty sweet chilli and peanut dipping sauce. These were unlike anything I’ve ever tasted and so simple to make. They’d be perfect as a canapé, a starter or even as a side dish with your summer barbeque, I really can’t recommend them highly enough. 

The main course was a more traditional arharn gap kao (food eaten with rice) dish. A fiery chicken curry that combined rich spicy and tart flavours served with the Thai staple glutinous rice, so called because it has a slightly sticky texture. I love the traditional bamboo steamer it was cooked in!

We finished off with a roti. Unlike the savoury Indian version, in Thailand these are often served with banana and drizzled with condensed milk as a desert. Like the prawn cakes, roti are delicious but super easy to make. First a pancake-like dough is made from wheat flour, an egg, a little melted butter and a pinch of salt, this is then kneaded together and allowed to rest before being rolled out as thin as possible and fried until golden on both sides. The filling is added to the middle and the roti folded in around in. A quick drizzle of condensed milk finishes it off.  If you have a sweet tooth like me this would be a great alternative to the traditional British pancake for breakfast. Click here for a great quick and simple roti recipe you can easily recreate at home.

Bamboo rice steamer with traditional Thai Glutinus Rice & Banana Roti


The recipes for all the dishes can be found in David Thompson’s Thai Street Food. Available here from Amazon.co.uk I hope I've inspired you to give Thai food a go!
Related Posts Plugin for WordPress, Blogger...